Refashioned Sweater into Cardigan
October 28, 2007 at 5:36 pm 31 comments
I finished a couple more projects over this weekend, including a refashioned sweater into a delightful cardigan! I am still new to blogging, so I am not sure how to put this tutorial into a seperate page (so those that are not interested don’t have to read a super long post!), but I will figure it out soon enough. The project took approximately 2.5 hours to make, and was really fun to do. If you’re interested in a tutorial, see below. If not, here are some before and after pics:

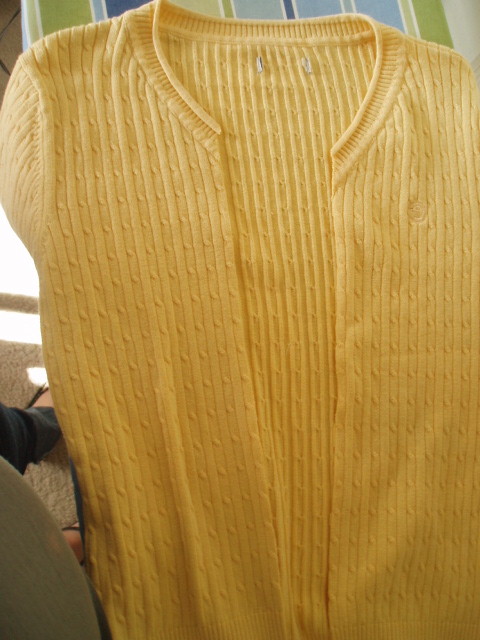
Before, butter- yellow, yet boring cabled sweater…

Snazzy new cardigan!
(Read on for tutorial….)
Materials Needed:
- One sweater that fits you well (crew neck or V-neck)
- 1/2 yard complimentary fabric (cotton works best, look in the quilting section for inspiration!)
- 1/2 yard light-weight interfacing
- complimentary thread
- 4 or 5 matching buttons, depending on size
Total time: 2.5 hours
Total cost: About $3.50 (for fabric; sweater, buttons, interfacing, thread were in stash!)
Step 1:
Prewash and iron all fabric, including sweater. Measure the neck circumfrence of sweater.

Measure the length of the body of the sweater so you know how long to make the button bands.

Step 2: Cut your pattern pieces. I used a peter pan collar template for my collar, but you can use any kind of collar you desire. For the peter pan collar, cut 4 pieces of fabric and 2 pieces of interfacing:
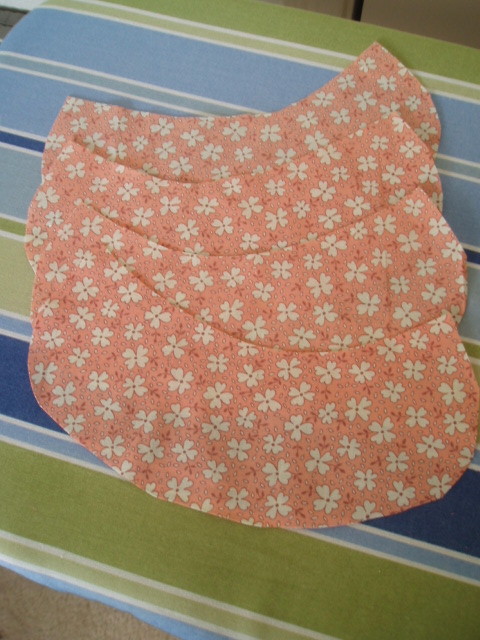
In addition cut 4 pieces of fabric that are 2.5″ in width and the length of your sweater (mine was 18″, so I added an additional 1/2″ for seam allowances). Cut two matching pieces of interfacing.
(Totally unrelated – my kitten was begging to come in and help me sew <I never let the kittens into the craft room – disaster!>, so I let her in and she instantly fell asleep as she watched me press pattern pieces)

Step 3: Iron interfacing to pieces of matching fabric. You should have 2 interfaced collar pieces and 2 interfaced button bands.

Step 4: Match un-interfaced pieces with their interfaced counterparts, right sides together. Pin and stitch with a 1/4″ seam allowance.

Step 5: Trim edges on button bands, and notch edges of collar pieces, so that they will lie flat when turned right-side out.

Step 6: Turn pattern pieces right-side out, top stitch if desired (I recommend this). Press pieces to set stitches. Set aside.
Step 7: Cut a 2.5″ strip out of your sweater, making sure it is centered.
Step 8: Pin button band pieces along center seams that you just created, right sides together. Do the same for the other side. Stitch, staying close to edge and press seams towards body of the sweater.

Step 8: Pin collar pieces to inside of collar seam, matching front of collar so that it sits near the button band. Pin, and stitch in place. Press seam down towards the sweater, flipping collar to other side of the sweater so that the right side shows.

Step 9: Mark out placement of button holes and buttons on button band. If you have an automatic buttonhole maker on your machine, use that. Add buttons to other button band so that they match up with holes. Press button bands and collar. You may want to use a few anchoring stitches to hold collar in place. That’s it!

You could now add matching sleeve cuffs, pockets, or whatever else you want to do.

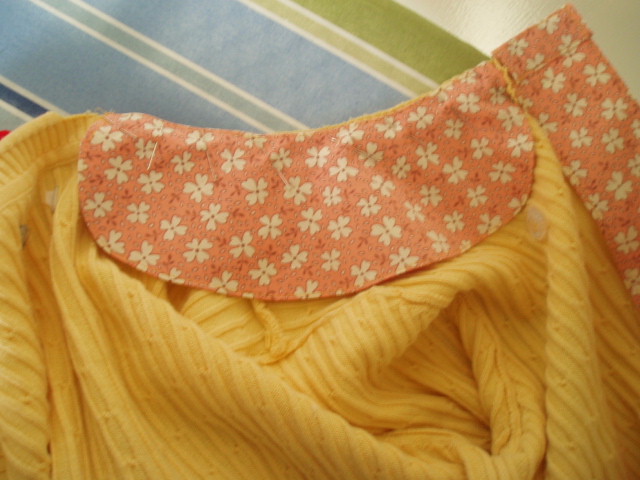
Close-up of button band.
Let me know if you have any questions or if I can clarify anything. Happy sewing.
Entry filed under: Blogroll, Sewing. Tags: cardigan, cats, craft, reconstructed, Sewing, sweater, wardrobe refashion.
31 Comments Add your own
Leave a reply to tayla Cancel reply
Trackback this post | Subscribe to the comments via RSS Feed

1. calegar | October 28, 2007 at 6:16 pm
This is amazing to me! It turned out so beautiful. I will have to try this, but I think I lack the confidence. You make is sound so very simple – GREAT instructions!
2. hoganfe | October 28, 2007 at 6:30 pm
Wow that cardigan is awesome!! Thank you for the amazing tutorial!!
3. ericamakesstuff | October 28, 2007 at 6:43 pm
Thanks for your comments guys!! Give this a try, I think you will find it easier than you imagine. Start on a sweater that you don’t much care for, and see how it goes. Good luck!
4. geek+nerd | October 28, 2007 at 10:30 pm
This is completely cute – I’m definitely bookmarking this!
5. Penny | October 28, 2007 at 11:28 pm
Very nice! I too, have a hard time cutting into clothing, but after seeing your photos, I definately need to get over this!
6. southerngirlmusings | October 29, 2007 at 12:05 am
Wow, this is so cute and what a great refashion, thanks for sharing the tutorial.
7. jeanetta | October 29, 2007 at 1:27 am
o i cant wait to go to goodwill for possible pieces to do this with. so great!
8. Ryan | October 29, 2007 at 7:08 pm
I love this! What a fantastic idea…too bad I’ve already donated all my old clothes. Great job!
9. Amy | October 29, 2007 at 7:52 pm
This is great! Where did you find your peter pan collar template?
10. ericamakesstuff | October 29, 2007 at 8:02 pm
Thanks to everyone for the kind comments! I am glad you are enjoying my project. I made my own peter pan collar templace. It is pretty easy to replicate, it kind of looks like a kidney bean. Play around with a few different designs. I could scan mine in too, if you’d like!
11. Anna | October 30, 2007 at 5:17 pm
This is such a good job – you are so clever I’m very jealous. I’m going to have a go at this sweater though!
12. Beth | November 20, 2007 at 6:37 pm
The sweater looks so cute!
13. Stephanie | November 23, 2007 at 3:22 am
I have been wanting to do something like this for a while. Now that I see how great yours turned out, I am definitely going to try this! Thank you for providing the instructions and inspiration. 🙂
14. Ann | December 31, 2007 at 6:15 pm
For those of us fighting the middle-age spread, this is a great way to extend the life of items that would otherwise be too small. Thanks!
Ann
15. Refashioning/recycling sweaters into cardigans | Craft Test Dummies | April 17, 2008 at 11:27 pm
[…] I’ve found an idea for you! Over at Erica Makes Stuff, she’s posted a step-by-step tutorial on refashioning your old sweater into a spiffy new […]
16. Cate | April 22, 2008 at 6:35 am
wonderful idea! kudos!
17. Katyusha | June 1, 2008 at 11:29 pm
Great idea, gorgeous, and wearable in real life. Thanks for your great tutorial. So glad I found your site through ThreadBanger.
18. HeidiMonkey | November 6, 2008 at 12:15 am
This is fantastic, I’m going to refashion one of my own tonight. Thanks for posting!
19. erica!! | December 30, 2009 at 10:04 pm
wow that looks great by the way I HAVE UR NAME! tee hee
20. Stashbusters – week two « In between feeds | April 15, 2010 at 6:48 pm
[…] are so many tutorials out there for sweater to cardi refashions I couldn’t tell you which inspired […]
21. DIY:Transformando um suéter em cardigã | SuperZiper | July 4, 2010 at 7:01 pm
[…] um tuto legal do blog Erika Makes Stuff (em ingês) mostrando como transformar um suéter em V num cardigã com gola […]
22. Sandra | November 8, 2010 at 5:31 pm
I want to try this with a wool sweater. How come it doesn´t unravel? I don´t knit and will only use my sewing machine to refashion. Any tips?Thanks
23. Olivera | December 13, 2010 at 9:39 am
Veoma interesantna ideja. Planiram da probam isto sa jednim od svojih starih dzempera. Hvala!
Very interesting idea. I want to try this with one old sweater. Thanks.
24. Bonnie | June 20, 2011 at 12:55 pm
how do you sew it without stretching out the seams? I’ve tried repairing sweaters but only to stretch them out.
25. Refashion Show! Cardigan Update « Buzz Deb | November 29, 2011 at 5:31 pm
[…] eight… Well I did that with this sweater. But luckily the internet was there to save me. The internet told me to cut my sweater up. So I […]
26. tayla | June 11, 2012 at 10:05 am
How do you sew the hole for the button? This is probably a very stupid question but i am just beginning to learn buttons.
27. Plain Sweater to Collared Sweater Refashion | January 10, 2013 at 6:26 pm
[…] Be sure to check out the full tutorial at Erica Makes Stuff! […]
28. Ginger | January 11, 2013 at 3:15 pm
So cute!! And thanks for the tutorial. 🙂
I’d love if you linked up to my Show & Tell party this week. http://www.gingerlymade.com/2013/01/show-tell-8.html
29. #80 Jumper to Cardigan DIY | Twinterest | April 15, 2013 at 4:22 pm
[…] from Erica Makes Stuff […]
30. farm Games Online | September 15, 2013 at 8:14 am
Appreciating the hard work you put into your blog and in depth
information you offer. It’s awesome to come across a blog every once in
a while that isn’t the same old rehashed information.
Excellent read! I’ve bookmarked your site and I’m including your RSS feeds to my Google account.
31. Victoria | August 1, 2014 at 2:45 pm
Your sweater looks awesome! And who knew? Sewing makes kitties sleepy! 😉